Monday, December 29, 2008

Opening multiple NetBeans IDE instances simultaneously

Main concepts in this post:
  • --userdir NetBeans command line switch
  • opening multiple instances of NetBeans IDE
  • Netbeans about dialog box

This post answers questions like:
  • How to open two NetBeans IDE simulteneously?
  • What is NetBeans user directory?
  • What is the --userdir NetBeans command line switch?
  • How to know the current user directory of NetBeans?
  • How to use same NetBeans installation to open two instances?

Many a times we need to look two projects at the same time in NetBeans IDE.  If both the projects are open in two seperate NetBeans IDEs that will be easier to look into one IDE instance having one project and code into the other instance of the IDE for the other project.


The NetBeans IDE maintains one user directory for one instance.  The trick is to make seperate user directories and make shortcuts of NetBeans IDE to start the instances in those seperate user directories.  Through these shortcuts we can pass the instruction to the IDE about what user directory to choose while running the instance.

Let us take an example.  We will create two directories

1. D:\nbuserdir1 

and

2. D:\nbuserdir2

Now we will create two shortcuts on the desktop which can be done by copying the NetBeans shortcut in the start menu and making two copies with dufferent names.  Now we will right click on the shortcuts and will choose the properties.  Then we will change the execution path and add the additional part to that command as


<netbeanscommand> --userdir D:\nbuserdir1 for the first shortcut 

and

<netbeanscommand> --userdir D:\nbuserdir2 for the second shortcut.


Now we are ready to execute the NetBeans IDE in two instances.  When we double click on those instances we will have two seperate IDEs running simulteneously.

To check which user directory is currently used by the running IDE we can open the Help > About diablog box.  This dialog box will also show us the user directory used by the running instance.


with regards
Tushar Joshi, Nagpur

Tuesday, December 16, 2008

Annoyed about NetBeans IDE

Danny Nieuwegein from Netherlands is annoyed about NetBeans IDE and the most annoying thing in NetBeans IDE as he mentions, in his blog is, CTRL-F4 closing not only the code windows, but also the project window! and when he cleans up his screen by holding CTRL-F4, all the windows including project windows gets closed and then he need to track down the option to turn the project window back on!

I tried what he is saying and indeed the CTRL+F4 keyboard shortcut closes one window at a time in NetBeans IDE and ultimately you get just the main window.

I think Danny wants a way to close only the editor windows.  I tried to find out how to do that by right clicking an editor window.


I go the keyboard shortcut for closing all the editor windows as CTRL + SHIFT + W and it worked.  So now atleast this cannot be a reason to get annoyed with NetBeans IDE and we can use this keyboard shortcut to close just the editor windows.

With Regards
Tushar Joshi, Nagpur

Wednesday, December 10, 2008

Adding MIT license in Java Class as Header

For our open source project jcompare we are using MIT license.  According to the open source tradition we wanted the MIT license to be included in our source code files.  NetBeans makes the inclusion of license piece of cake through the templates feature.

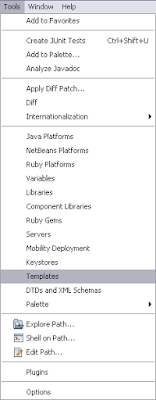
We will use the Tools Menu and Templates option
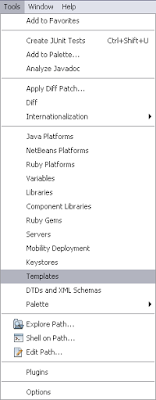

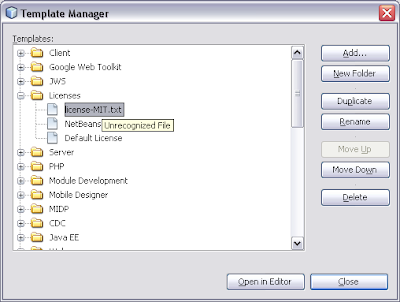
In the various categories we have to select the Licenses Node.  We need MIT license to be listed there.  Initially there are only two entries under the Licenses node.  NetBeans CDDL and Default License.  The best way to create another license is select existing license and press the Duplicate button.

Let us press the duplicate button and we get a new License entry.  Important thing to note here is the license name shall be exactly as license-MIT.txt  

This will ensure we can use the default Java Class template as it is.   Now we will select that entry license-MIT.txt and press the Open in folder button to open this file.  We will have to change this file with our MIT license text which we will get from OSI site.


<#if licenseFirst??>
${licenseFirst}

${licensePrefix}Copyright (c)
${licensePrefix}
${licensePrefix}Permission is hereby granted, free of charge, to any person obtaining a copy
${licensePrefix}of this software and associated documentation files (the "Software"), to deal
${licensePrefix}in the Software without restriction, including without limitation the rights
${licensePrefix}to use, copy, modify, merge, publish, distribute, sublicense, and/or sell
${licensePrefix}copies of the Software, and to permit persons to whom the Software is
${licensePrefix}furnished to do so, subject to the following conditions:
${licensePrefix}
${licensePrefix}The above copyright notice and this permission notice shall be included in
${licensePrefix}all copies or substantial portions of the Software.
${licensePrefix}
${licensePrefix}THE SOFTWARE IS PROVIDED "AS IS", WITHOUT WARRANTY OF ANY KIND, EXPRESS OR
${licensePrefix}IMPLIED, INCLUDING BUT NOT LIMITED TO THE WARRANTIES OF MERCHANTABILITY,
${licensePrefix}FITNESS FOR A PARTICULAR PURPOSE AND NONINFRINGEMENT. IN NO EVENT SHALL THE
${licensePrefix}AUTHORS OR COPYRIGHT HOLDERS BE LIABLE FOR ANY CLAIM, DAMAGES OR OTHER
${licensePrefix}LIABILITY, WHETHER IN AN ACTION OF CONTRACT, TORT OR OTHERWISE, ARISING FROM,
${licensePrefix}OUT OF OR IN CONNECTION WITH THE SOFTWARE OR THE USE OR OTHER DEALINGS IN
${licensePrefix}THE SOFTWARE.
<#if licenseLast??>
${licenseLast}


Next step we will follow is to open the project.properties file.  We will navigate to the Files panel and expand the nbproject folder to see this file and double click on it to open it in editor.


We will add a new property in this file at the end.
That property will be

project.license=MIT


Now when we create a new class in our project the license text will be included as required.


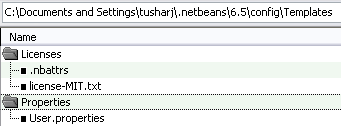
The license file gets created in the config\Templates folder of the NetBeans user directory as shown in the image below:
with regards
Tushar Joshi, Nagpur

References:
UPDATE: NetBeans License Templates - John Yeary - John has more templates for licenses

Real @author name in java classes

When we create a new class in NetBeans the class is created using the default template for a Java class and this template uses the user name which is created as the computer user.  In my case it is tusharj.  This makes the class use my name as


@author tusharj


which is not exciting.  I want to use my real name and my email address after the @author java doc tag.

NetBeans provides a way to specify your own name to be used here.  Open the Tools Menu and choose the Templates option.

In the long list of Templates locate the User Configuration Properties Node and select its child node User.properties


Uncomment the #user line and add your name and email address.  Check the name I have written for me in the image below.


Now when we create a new Java class 


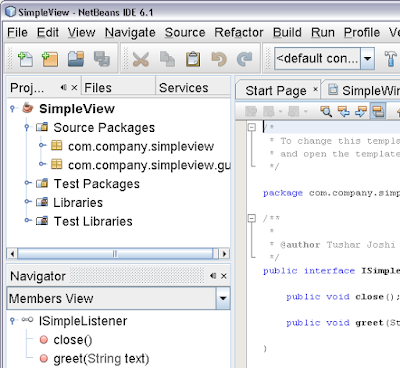
We can see the @author tag with my real name 

with regards
Tushar Joshi, Nagpur

Wednesday, November 26, 2008

Running ANT targets from NetBeans IDE

NetBeans IDE used ANT for building Java projects.  Many times it is not obvious for new people to know how to run custom ANT targets from NetBeans IDE.


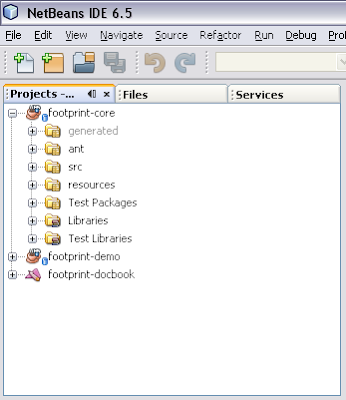
The footprint project has its own ANT build script with lots of custom targets.  Let us see how to run one of the targets from the build script.  To see the build script we will navigate to the Files panel which is second tab just right to the Projects panel.


We can see our build.xml build script.  When you click on that file name the contents of the file will be instantly shown in the Navigation panel below the Files Panel.  Now we can issue the Run Target command from both the panels Files as well as Navigator.

We will just have to right click the desired target and say Run Target >  and the target will be executed for you.


with regards
Tushar Joshi, Nagpur

Wednesday, November 19, 2008

NetBeans IDE 6.5 Released


NetBeans IDE 6.5 offers simplified and rapid development of web, enterprise, desktop, and mobile applications with PHP, JavaScript, Java, C/C++, Ruby, and Groovy.

New features include a robust IDE for PHP, JavaScript debugging for Firefox and IE, and support for Groovy and Grails. The release also delivers a number of enhancements for Java, Ruby on Rails, and C/C++ development. Java highlights include: built-in support for Hibernate, Eclipse project import, and compile on save. Combining excellent out of the box experience, compelling features, and a great plugin ecosystem.

NetBeans IDE 6.5 is currently available in English, Japanese, Simplified Chinese and Brazilian Portuguese. There are several community contributed localization efforts underway to support additional languages. Join the efforts today.
More information about NetBeans IDE 6.5:
As always, NetBeans welcome and encourage feedback about your experience using the NetBeans IDE. Share your thoughts on NetBeans mailing lists and forums; if you blog about NetBeans add your blog to Planet NetBeans. NetBeans is now on Twitter! Follow NetBeans at twitter.com/netbeans to get the latest news and information, ask questions and engage with the NetBeans team.

Sunday, November 2, 2008

Learning NetBeans Platform through an example

I found a good GTD software today.  I downloaded it and gave it a trial run.  I liked the concept mapping for GTD in this software.  This software is complete in all professional software criterias.  The most important thing I noted in this software is, it is created using the NetBeans platform.


ThinkingRock as a NetBeans Platform implementation
The ThinkingRock software as is implemented in Netbeans platform I checked the license of the software and was delighted to see that it is having CDDL license and is a open source software.  I quickly downloaded the source from the SVN repository kept at sourceforge.net


Now I have a complete software implementation done in NetBeans Platform.  This will be a sample application for any NetBeans Platform study.  This software contains all the aspects which are expected in a professional software.

with regards
Tushar Joshi, Nagpur

Friday, August 15, 2008

Java Debugger New Feature

This is an attempt to create a short screencast about one new feature available in Java Debugger in NetBeans IDE 6.5 Beta onward releases.


If you happen to see this screencast please drop a comment. The quality of the screencast seems reduced after uploading to the blogger server. This way of blogging becomes handy when you want to show something you liked quickly to the community.

UPDATE: This screencast is now available on NetBeans.TV site. You can see the New Feature in Java Debugger with better quality there.

With Regards
Tushar Joshi, Nagpur

Thursday, August 14, 2008

Simplified GUI Code Generation

Fully Qualified Class Names
When we design JFrame, JPanels and any other GUI component in NetBeans the generated code contains fully qualified class names of the used classes.

For example let us create a sample JFrame form and add some components to that form through the form designer.

Let us keep the components to minimum as this is just an example. So we have added one label one text field and a button.
When we can see in the folded generated code for init components is all the components are defined and instanciated using the fully qualified class names.

More Human way of code writing
When we write code manually usually we do not write the fully qualified names, we make use of the import option and import all the classes at the top and use just the class names.

NetBeans IDE 6.5 Beta onwards we have a way to do just that. Now we can get simplified code through configuring NetBeans IDE and asking for simplified code.

Select the root component of the form from the Inspector panel. For our example we have clicked on the Form MainForm root node in the tree as shown above.

Now in the properties panel...

There is a new property named Generate Full Classnames and which will be by default checked if you havent done any setting yet. Let us uncheck that checkbox to make our code simpler.

Now the code looks simpler and easy to understand. This is how I will write the code if I write it manually, isn't it?

If you like this setting and if you want it to become the default behavior of the IDE then we have a global setting for it in the Tools > Options dialog box. Just select the Miscelleneous section and the GUI Builder tab. Ensure that Generate Fully Qualified Names of Classes checkbox is unckecked.

With Regards
Tushar Joshi, Nagpur

Wednesday, August 13, 2008

NetBeans IDE 6.5 Beta - Auto Download for Subversion Client 1.5 in Windows

NetBeans IDE 6.5 Beta no longer needs Subversion client installed on Windows XP machine. I got this information in the New and Noteworthy page and since then was excited to try out the NetBeans downloading feature of the Subversion Client 1.5 for Windows from the Update Center.

When you do not have Subversion client installed...


After creating a sample application and choosing the Import into Subversion repository... option, NetBeans IDE 6.5 Beta now shows a dialog box indicating that it could not find Subversion client installed and offers two ways to proceed.

NetBeans IDE 6.5 Beta Offers bundled client


Either choose to download the bundled Subversion 1.5 binaries for Windows from the Update Center or Install the SVN 1.5 Command Line client. It also recommends to choose the first bundled option.

After choosing the bundled Subversion option it shows the license agreement for downloading and installing the bundled Subversion Client.

Accepting the license starts the download in the background. We can see the progress of the download in the status bar of the IDE.


It installs the component smoothly and then asks to restart the IDE. Clicking the restart button makes the IDE shut down and start again. This time before the splash screen it shows an Update banner for some time and then the usual Splash screen.


We still need to create our own repository if we want to keep the project in local repository. If we have a remote Subversion server than we can directly use the server. The point is now NetBeans IDE 6.5 Beta is ready to work with Subversion repositories.

We will choose a local already created repository (through TortoiseSVN) for this example.


Rest all the dialog boxes for showing the list of files to be committed and asking the commit comment will be shown and the files will be committed to the Subversion repository.

Here we can see the project successfully committed to the local subversion repository. NetBeans IDE 6.5 Beta has taken a good step by providing the bundled Subversion client which makes installation and use of Subversion even more easier now.

with regards
Tushar Joshi, Nagpur

New Colors of the NetBeans IDE 6.5 Beta Installer

I joined the download party for NetBeans IDE 6.5 Beta today. This time the installer has new design and new 6.5 logo.

I downloaded the Java EE pack and this is what I got bundled in one installer. The Apache Tomcat 6.0 was not offered but through the Customize... button I got it listed in the list of to be installed components of the installer.

The installation was smooth. When I started NetBeans IDE 6.5 Beta I was surprised with the new design of the splash screen.

I liked what I saw. What about you?

With Regards
Tushar Joshi, Nagpur

Introducing NetBeans IDE 6.5 Beta

NetBeans IDE 6.5 Beta is released today.

Download NetBeans IDE 6.5 Beta Now


The NetBeans IDE 6.5 Beta release provides several new features and enhancements, such as a new IDE-wide QuickSearch shortcut, more user-friendly interface, and automatic Compile on Save.

In addition to full support of all Java editions (Java SE, Java EE, Java ME), the NetBeans IDE is the ideal tool for software development with PHP, C/C++, Groovy and Grails, Ruby and Rails, Ajax and JavaScript.

The 6.5 release also includes enhanced support for web frameworks (Hibernate, Spring, JSF, JPA), the GlassFish application server, and databases.

The main features supported and listed on netbeans site are

PHP

  • PHP Editor (Code completion, syntactic and semantic code highlighting)
  • Support for heredoc notation and PHTML
  • Xdebug
  • Generators for MySQL database code snippets
JavaScript and Ajax
  • JavaScript Editor and Debugger
  • JavaScript Library Manager
  • Yahoo UI, Woodstock, jQuery, Dojo, Scriptaculous, Prototype libraries
  • CSS Editor
Java EE & Web Development
  • Enhanced support for Spring, Hibernate, JSF, JSF CRUD generator, JPA (Java Persistence API)
  • Create RESTful web services from database tables or from JPA entities
  • Drag and drop SaaS services into PHP files
  • SQL Editor Improvements (code completion, save/recall queries, and more)

Groovy and Grails
  • Develop pure Groovy apps or use Groovy in Java SE projects
  • Groovy editor (code completion, highlighting, and more)
  • Grails web application framework
  • Open existing Grails applications without adding metadata

Ruby and Rails
  • Rake improvements: Rake Runner and a pre-generated Rake file
  • Debugger: Conditional breakpoints and catchpoints
  • Ruby projects accept JVM options from command line
  • New Test Runner interface for displaying test results

GlassFish v3 Prelude for Web Development
  • Modular, OSGi based architecture
  • Small footprint, fast startup and deployment
  • Support for scripting, including JRuby

C/C++
  • Improved code completion, error highlighting, and semantic highlighting
  • Call graph, Memory window
  • Remote development
  • Packaging of application as tar files, zip files, or SVR4 packages

Java ME
  • New project wizard for adding custom components to the Visual Designer Palette
  • New SVG UI components in the enhanced SVG Composer enable rich UI design
  • New Data Binding Custom Components in the Visual Designer Palette
  • Upgraded obfuscation tool to ProGuard 4.2 and test framework to JMUnit 1.1.0

Java SE
  • Multi-threaded Java debugging
  • Java Swing GUI Builder: TreeModel Editor for JTrees
  • Improved Eclipse project import and synchronization

IDE Tools and Usability
  • One QuickSearch shortcut for IDE actions, files, options, and docs
  • Support for Windows UNC paths (shared network folders)
  • Automatic Compile on Save / Deploy on Save
With Regards
Tushar Joshi, Nagpur

Sunday, July 27, 2008

NetBeans in Education

First part of the “Introduction to Programming” has been made available at the Edu site, http://edu.netbeans.org/. This is a course created by a team of Java instructors in the Philippines. The course outline, teacher's manual, student's manual, and all related NetBeans projects are available for you to use in the classroom.

The course is aimed at complete newbies, not only newbies to Java, but newbies to programming. If you have a group of students who fall into that category, hop over to http://edu.netbeans.org/ and download the courseware and use them as much or as little as you like.


(Taken from nbedu mailing list)

Tuesday, May 13, 2008

Passion for blogging about NetBeans IDE

NetBeans IDE 6.1 Beta blogging contest brought motivation for many bloggers. Many new blogs started and old ones continued to speak about NetBeans IDE.

With the list of top 10 winners the complete list of all participating entries is also published. Some more information which can be deduced from that list is bloggers have also submitted multiple entries for the contest.

These are the participants having maximum entries in the contest:

Tushar Joshi (This blog) 19 entries
Adam Bien 8 entries
Rhawi Dantas 7 entries
Alan M. Feldstein 4 entries
Jacek Laskowski 4 entries
Junji Takakura 4 entries


I have not included many bloggers having 3 or less than three entries. The multiple entries shows the flow of energy happening and the passion amongst the bloggers about using and blogging for NetBeans.

with regards
Tushar Joshi, Nagpur

NetBeans IDE Blogging Contest Results


The results for the NetBeans IDE 6.1 Beta Blogging Contest are out. Congratulations to all 10 $500 American Gift Card winners and all other 100 winners who will get a NetBeans T-Shirt.

The results are available on the NetBeans Blogging Contest Page.

The top 10 winning posts are as follows:

Matthew Nuzum
English Netbeans 6.1 spanks Eclipse and challenges Visual Studio
Patrick Julien
English NetBeans 6.1: The Best just got Better
Ding Liang
Chinese About NetBeans
Diego Silva
Spanish JavaScript en NetBeans 6.1
Wagner Roberto dos Santos
Portuguese O que podemos esperar do NetBeans 6.1 ?
Pat Coleman English Can NetBeans create a code-less P2P app?
James Eliyezar
English Subversion and NetBeans - A quick start guide
Junji Takakura Japanese NetBeans 6.1 RC to use PHP
Jacek Laskowski
Polish NetBeans IDE 6.1 - Spring Framework Support
Joshua van Aalst English NetBeans 6.1 A Delight To Use

The list of participating blogs is published in a separate URL.

with regards
Tushar Joshi, Nagpur

Sunday, May 4, 2008

NetBeans IDE - Default Font Size

When we set out to search for the tips regarding how to change the default font and default look and feel for NetBeans IDE we get related information in seconds through any decent search engine.

Even then I am adding the same information again here with some fresh screenshots with the intension that,after this the user can find the information even sooner than I got it.

The default font size used by NetBeans IDE 6.1 is small and decent.


Some users may have different needs and want the font size to be bigger. NetBeans IDE has the facility to change the default font size through the configurations settings just like Look and feel setting.

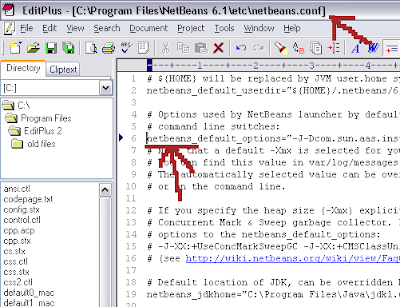
In the netbeans.conf configuration file for NetBeans IDE which can be found in


C:\Program Files\NetBeans 6.1\etc\netbeans.conf


for the default Windows XP NetBeans IDE installation we can add the fontsize option to the netbeans_default_options string value


--fontsize 18


so make the configuration look like


netbeans_default_options="<old-options> --fontsize 18"


where <old-options> are the values already there which we will keep as they are and will add the new settings --fontsize.

This setting will make the default font size bigger and look like:


See how bigger the fonts can be seen now. Even the menus look like:


References:

NetBeans IDE Hacks part 2 font-size
NetBeans IDE Hacks part 2 laf


with regards
Tushar Joshi, Nagpur

Saturday, May 3, 2008

NetBeans IDE - Look and Feel

The default look and feel of the recently released NetBeans IDE 6.1 final is set automatically according to the operating system. This make the NetBeans appear as a Windows application with Windows look and feel while running on windows and so forth in other operating systems.

(Default look and feel on windows XP)

I like the cross platform look of java applications which can be set by configuring the java applications with the Metal look and feel. NetBeans also allows us to change the default look and feel by a configuration setting.

Ideally I would have loved to have a look and feel menu or a setting in the preferences dialog in the NetBeans IDE GUI to set the look and feel. The current way to change the default look and feel is either by changing the configuration file or passing a command line argument to the netbeans startup command.

I will use the configuration file setting method to change the default look and feel of NetBeans IDE.

As this setting is a configuration setting I will have to pass the exact fully qualified name of the look and feel class I want.

In our case as we want metal look and feel we will use the name:

javax.swing.plaf.metal.MetalLookAndFeel

When default paths are chosen for the installation of NetBeans IDE it gets installed in


C:\Program Files\NetBeans 6.1


The configuration files are kept in a subdirectory named etc so the exact path for the netbeans.conf file is:


C:\Program Files\NetBeans 6.1\etc\netbeans.conf


When opened in text editor it will look like


Here we will change the netbeans_default_options portion and add one additional switch to the options line.

(netbeans.con snap without look and feel setting)

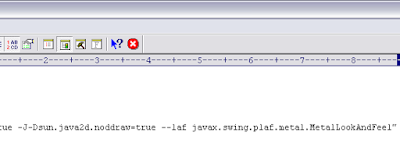
We will add the look and feel option like


--laf javax.swing.plaf.metal.MetalLookAndFeel


(netbeans.conf with the additional look and feel option)

Now when we start the NetBeans IDE again the look and feel will be seen as Metal.

(Cross platform Metal look and feel)

References:

NetBeans Wiki: FAQ Custome Look and Feel
Java Tutorials: How to set Look and Feel

with regards
Tushar Joshi, Nagpur