Sunday, August 23, 2009

Making executable desktop application in NetBeans

UPDATE (26 Aug 2009): NetBeans IDE can create executable JAR for any Java project. The steps described in this post are just one way of creating the executable JAR and not the only way. Following the steps described in this post any Java project can be bundled as a JAR executable project.


Topics covered in this post:
  1. How to create a desktop application in NetBeans?
  2. Where is the JAR file after building the application in NetBeans?
  3. Can a Java Desktop application started by double clicking?
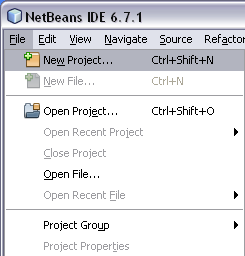
We will start with creating a New Project in NetBeans. This is done by choosing menu File > New Project...

In the New Project dialog box choose Java in categories and Java Desktop Application in the projects List box. Then click the Next button.

Choose all the default values offered by NetBeans IDE in the New Desktop Application dialog as we want to see what is offered as defaults by NetBeans. Click Finish to allow NetBeans to create a new project for us.


After we click finish we get a desktop application with some boilerplate code and windows.


Click the Run button in the tool bar or choose menu Run > Run Main Project to see what is displayed when we Run the application with the default code.


We can see that the generated project is a complete application which runs and shows a window with menu and status bar. To run the application outside NetBeans let us build the application. The current version of NetBeans IDE 6.7.1 compiles and builds the project automatically as you save the project. Let us invoke the menu Run > Clean and Build Main Project to see the build process and the message which is shown after a successful build. This message has a tip for us.


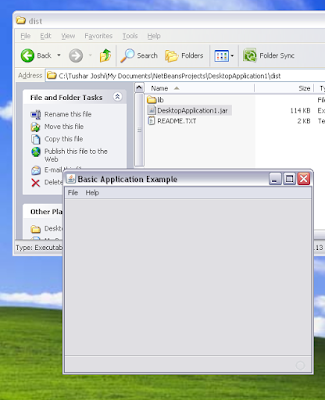
The build successful messages tells us the exact location where the application JAR file is kept. We can navigate to that folder through Explorer and double click the JAR file.


The application is not dependant on NetBeans once it is build. Check the JAR file in the folder, in our case it is DesktopApplication1.jar.


When we double click this JAR file the application starts as if like a EXE file. Java is registered in windows registry as the handler of JAR files so when we double click the JAR file windows shell invokes Java Virtual Machine and hands this JAR file name over to it, so it can execute it for us.


Sometimes software like Nokia PC Suite adds JAR file handler entries in windows registry, in that case the JAR file may not run exactly as I have shown. If that happens just right click on the JAR file and choose Open With option. You will get all the application names registered to handle JAR files and choose Java in this menu to achieve the execution of JAR file.

The JAR file created by NetBeans is executable because NetBeans adds a MANIFEST.MF file in the JAR with proper entry of the Main class of the project.

with regards
Tushar Joshi, Nagpur

Wednesday, August 12, 2009

SHIFT+Click to close all Editor Tabs and ALT+Click to Close all others

Tips covered in this post:

  • How to close all the editor tabs in NetBeans IDE?
  • How to close all other editor tabs except the current one in NetBeans IDE?
  • How to use mouse and keyboard combination for productivity in NetBeans IDE
SHIFT+Click
When there are many editor tabs open in NetBeans IDE and we want to close them all, we have the keyboard shortcut of CTRL+SHIFT+W, but this can also be done using mouse and a single click. Just hold the SHIFT key and click on any of the editor tab close marks and wooooosh all the editor tabs will be closed.

ALT+Click (Option+Click in Mac)
When there are many editor tabs open and we want to keep only one tab open and close all the others in a single click, just hold the ALT button and click on the close button of the editor tab you want to keep open. This will close all the other editor tabs and only the one you clicked is retained.

with regards
Tushar Joshi, Nagpur

Tuesday, June 30, 2009

Download NetBeans IDE 6.7

NetBeans IDE 6.7 is out and available for download. The description as given in mailing list is as follows:


The focus of NetBeans IDE 6.7 is connectivity—helping developers to connect to the latest technologies and to each other. New features include integration with Project Kenai, a collaborative environment for developers to host their open-source projects; native Maven support, and Hudson integration.

Building on the success of previous releases, NetBeans IDE 6.7 offers enhancements for Java, PHP, Ruby, JavaScript, Groovy and C/C++, and more. Additional highlights include a self-diagnostic Profiler, and support for SVG Rich Components, remote debugging in Ruby, and the latest version of GlassFish. The release also provides plug-in support for Zembly, a single registry and repository for popular Web APIs.

Providing superior support for multiple languages and innovative team support through Project Kenai, the NetBeans IDE 6.7 is the ideal tool for developers to stay connected to their teams and to the latest technologies!

NetBeans IDE 6.7 is available in English, Brazilian Portuguese, Japanese and Simplified Chinese. There are several community-contributed localization efforts underway to support additional languages. Join the efforts today.

More information about NetBeans IDE 6.7:
As always, we welcome and encourage feedback about your experience using the NetBeans IDE. Share your thoughts on our mailing lists and forums. If you blog about NetBeans add your blog to Planet NetBeans. Follow NetBeans on Twitter for updates about NetBeans news and development.

NetBeans IDE Connects Developers!

Friday, February 20, 2009

Opening NetBeans projects and files from Linux File Browser

This post covers the topics as follows:
  • How to add Open with NetBeans option in the Ubuntu (Nautilus) context menu?
  • How to open Projects and files from Linux File Browser (in our case Ubuntu Nautilus)?
  • How to use Netbeans IDE as a generic file editor?
As described in the earlier post NetBeans IDE has a command line option --open which allows us to open any file and folder through command line in NetBeans IDE.  Let us check how easy it is to add a context menu option on Linux for this technique.

Adding Open with NetBeans context menu in Linux File Browser
We will open File Browser in Ubuntu which happens to be Nautilus application.  We will navigate to the user home and on the folder icon we will right click to see the context menu.  We will select the option "Open with Other Application..." option.


Open With dialog box will be shown with the "Use a custom command" portion collapsed.  We will click on this portion to get the expanded view of the dialog


The expanded view of the Open With dialog will allow us to type the custom command, which in our case will be 

/usr/local/netbeans-6.5/bin/netbeans --open


The folder will get open in NetBeans IDE when we will press the Open button now.  Not only this but now the option of Open with NetBeans will be added to the context menu for this user. We can check that by navigating to any folder which is a NetBeans project and right clicking it.  Now we can see the Open with "netbeans" option in the context menu.


This makes opening projects in NetBeans IDE a piece of cake.  Not only projects but any folder can be open like this in NetBeans IDE using this context menu.  If the folder is not a NetBeans Project it will get opened like a folder explorer panel which is very handy to work with files.  See how the opened project looks like when opened through this context menu.


Opening files using context menu in File Browser in Linux
Using the same technique we can also add a context menu for files.  Let us right click a file and select the "Open with other Application..." option from the context menu.


Again the Open With dialog will pop up. We will type the same custom command here also.


Now the context menu for files is ready to use.  Let us right click on any file and we get a Open With sub menu, which has many options including the Open with "netbeans" option also.  Now we can use this context menu option to open literally any file from the File Browser.


When a file is opened like this NetBeans IDE provides all the syntax highlighting features for the file type.  This makes NetBeans IDE a general purpose editor for any file.


I also tried to run a simple Java file opened like this in NetBeans IDE and it executed and displayed the output on the output window.

with regards
Tushar Joshi, Nagpur

Thursday, February 19, 2009

Open with NetBeans context menu in Windows

This post covers the following topics:
  • How to add Open with NetBeans to windows file and folder context menu
  • How to open any file in NetBeans without creating a project
  • How to use NetBeans IDE as a file and folder explorer
  • How to use the --open command line option for NetBeans IDE

--open command line option for NetBeans IDE
NetBeans IDE identified --open command line option and opens the file or folder given as an argument after this command line option.  This fact makes the NetBeans IDE useful to open any file and folder through command line.  In windows we can use this feature to introduce a context menu for files and folders in Explorer by tweaking the Windows Registry.

Adding Open with NetBeans option to windows context menu
In windows we can add two extries to the Windows Registry to add Open with NetBeans option to the Windows Explorer context menu.  These entries need absolute path of the NetBeans IDE executable so while trying this trick please check the NetBeans IDE executable path.

My NetBeans IDE 6.5 executable path is

C:\Program Files\NetBeans 6.5\bin\netbeans.exe

We can add the registry entries manually by opening the regedit.exe application from the Start > Run menu, or we can create a REG file to achieve this.  Creating the REG file is the easiest option.  We will create a file with name openwithnetbeans.reg and we will copy the following contents in that file. Double clicking this REG file will add these registry entries to the Windows registry as required.


Windows Registry Editor Version 5.00

[HKEY_CLASSES_ROOT\*\shell\Open with NetBeans\command]
@="\"C:\\Program Files\\NetBeans 6.5\\bin\\netbeans.exe\" --open \"%1\""

[HKEY_CLASSES_ROOT\Folder\shell\Open with NetBeans\command]
@="\"C:\\Program Files\\NetBeans 6.5\\bin\\netbeans.exe\" --open \"%1\""

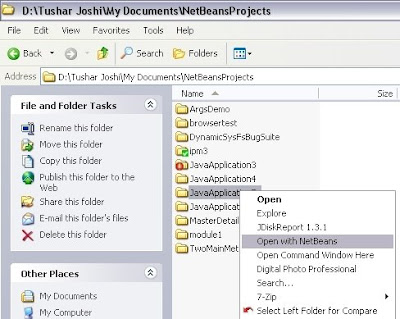
Now when we open the Explorer and right click on a NetBeans project folder we get option as Open with NetBeans and clicking on this option will start the NetBeans IDE and will open this project in the IDE.


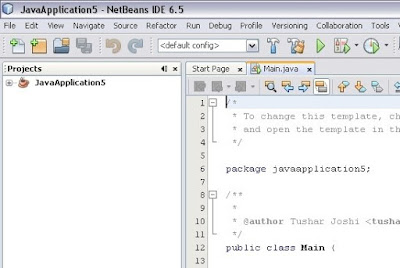
We can see the project open in the NetBeans IDE for us.


When NetBeans IDE is already open this command will open the project in the existing IDE.  

Opening any file in NetBeans IDE from Windows Explorer
Now when we right click on any file in the Windows Explorer we get the same option of Open with NetBeans and the file gets open in the existing NetBeans IDE or if it is not open a new one is started for us.

This makes NetBeans IDE a general purpose editor for me to edit any file in my computer.  

with regards
Tushar Joshi, Nagpur

Tuesday, February 17, 2009

Using Command Line Arguments in NetBeans IDE

This post covers the following points:
  • How to open the project properties dialog box for NetBeans IDE projects?
  • How to use command line arguments while running programs through NetBeans IDE?
NetBeans IDE provides a way to invoke our Java program having a main method with command line arguments.  Let us walk through this process.  We will create a new Java Application project and will add some code to the Main method which will print the provided command line arguments on the console.

Test Code we have written in the Main method:


/*
* To change this template, choose Tools | Templates
* and open the template in the editor.
*/
package com.tusharvjoshi.argsdemo;

/**
*
* @author Tushar Joshi
*/
public class Main {

/**
* @param args the command line arguments
*/
public static void main(String[] args) {
if (args.length == 0) {

System.out.println("No Command Line arguments");

} else {

System.out.println("You provided " + args.length
+ " arguments");

for (int i = 0; i < args.length; i++) {
System.out.println("args[" + i + "]: "
+ args[i]);
}
}
}
}


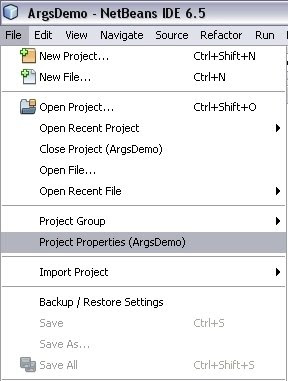
Opening the project properties dialog boxWe can either right click on the project name in the Projects panel and choose the properties option, or we can choose the Project Properties option from the File menu.


Saving the command line arguments

In the project Properties dialog box we will have to choose the Run node from the left Categories tree.  As soon as we select the Run node we can see the options for the run configuration.

In the Arguments text box we have to type our command line arguments.  We can see we have typed "one two three" as the options in the dialog box for testing.


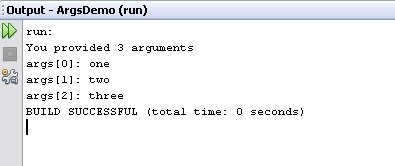
Now when we Run the project the project will run as if these command line arguments are being typed in front of the java command.  We can see the output window to check how the arguments are printed by our test code.

with regards
Tushar Joshi, Nagpur

UPDATE: 21 Mar 2014:
There is a plugin available for NetBeans IDE 8.0 which allows interactive command line arguments facility to the IDE, more details are in this post


Monday, February 2, 2009

NetBeans Voice of Community Process (VOC)


NetBeans is growing day by day as a IDE as well as a platform for RCP.  There is considerable volume of community attached with the NetBeans development and looking forward for the new features getting inroduced and also to the issues they face with the NetBeans IDE.

Feedback from Community
Community has many ways to manifest their feedback in the current Web2.0 age.  They write blogs, they write twitter messages, they write forum posts, they file bugs and request for enhancements in the NetBeans IssuZilla.   They write mails in the mailing lists like nbusers nbdev and openide.  

One more effort to listen:
It is thought that increasing overall satisfaction with NetBeans will support Word of Mouth adoption of the IDE which will support further growth of NetBeans userbase. That's why we needed a coordinated process whose primary motivation is to fix issues not only show that we care.

What is VOC?
NetBeans Voice of Community process is started keeping this in mind and it is a team of 3 community members and one representative from Sun. Along with me the other two community members who are now called as VOC Captains are Annabel Melongo and Michel Graciano.  The Sun representative is Jiri Kovalsky.

How VOC will work?
Channels are identified to gather feedback like nbusers@netbeans.org mailing list, netbeans chat, blogs, forums like DZone, TheServerSide.  So as soon as we find a issue or feedback which has BIG impact on NetBeans and where we know the reported of the issue and when the issue is reproducible we will register that issue as VOC issue and it will be given priority by the development team in the process of development of NetBeans.

How to send feedback directly to VOC?
Community members and NetBeans users can directly send their feedback to the VOC mailing list at voc@netbeans.org No subscription to the mailing list is needed to send the feedback.

References:
VOC Page

with regards
Tushar Joshi, Nagpur