Friday, February 20, 2009

Opening NetBeans projects and files from Linux File Browser

This post covers the topics as follows:
  • How to add Open with NetBeans option in the Ubuntu (Nautilus) context menu?
  • How to open Projects and files from Linux File Browser (in our case Ubuntu Nautilus)?
  • How to use Netbeans IDE as a generic file editor?
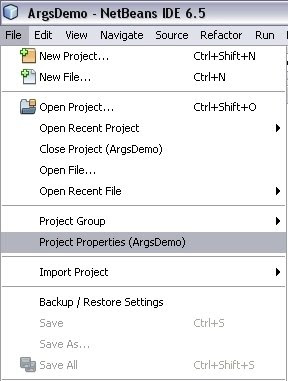
As described in the earlier post NetBeans IDE has a command line option --open which allows us to open any file and folder through command line in NetBeans IDE.  Let us check how easy it is to add a context menu option on Linux for this technique.

Adding Open with NetBeans context menu in Linux File Browser
We will open File Browser in Ubuntu which happens to be Nautilus application.  We will navigate to the user home and on the folder icon we will right click to see the context menu.  We will select the option "Open with Other Application..." option.


Open With dialog box will be shown with the "Use a custom command" portion collapsed.  We will click on this portion to get the expanded view of the dialog


The expanded view of the Open With dialog will allow us to type the custom command, which in our case will be 

/usr/local/netbeans-6.5/bin/netbeans --open


The folder will get open in NetBeans IDE when we will press the Open button now.  Not only this but now the option of Open with NetBeans will be added to the context menu for this user. We can check that by navigating to any folder which is a NetBeans project and right clicking it.  Now we can see the Open with "netbeans" option in the context menu.


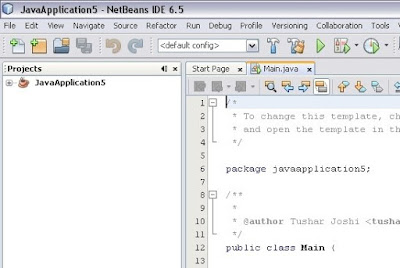
This makes opening projects in NetBeans IDE a piece of cake.  Not only projects but any folder can be open like this in NetBeans IDE using this context menu.  If the folder is not a NetBeans Project it will get opened like a folder explorer panel which is very handy to work with files.  See how the opened project looks like when opened through this context menu.


Opening files using context menu in File Browser in Linux
Using the same technique we can also add a context menu for files.  Let us right click a file and select the "Open with other Application..." option from the context menu.


Again the Open With dialog will pop up. We will type the same custom command here also.


Now the context menu for files is ready to use.  Let us right click on any file and we get a Open With sub menu, which has many options including the Open with "netbeans" option also.  Now we can use this context menu option to open literally any file from the File Browser.


When a file is opened like this NetBeans IDE provides all the syntax highlighting features for the file type.  This makes NetBeans IDE a general purpose editor for any file.


I also tried to run a simple Java file opened like this in NetBeans IDE and it executed and displayed the output on the output window.

with regards
Tushar Joshi, Nagpur

Thursday, February 19, 2009

Open with NetBeans context menu in Windows

This post covers the following topics:
  • How to add Open with NetBeans to windows file and folder context menu
  • How to open any file in NetBeans without creating a project
  • How to use NetBeans IDE as a file and folder explorer
  • How to use the --open command line option for NetBeans IDE

--open command line option for NetBeans IDE
NetBeans IDE identified --open command line option and opens the file or folder given as an argument after this command line option.  This fact makes the NetBeans IDE useful to open any file and folder through command line.  In windows we can use this feature to introduce a context menu for files and folders in Explorer by tweaking the Windows Registry.

Adding Open with NetBeans option to windows context menu
In windows we can add two extries to the Windows Registry to add Open with NetBeans option to the Windows Explorer context menu.  These entries need absolute path of the NetBeans IDE executable so while trying this trick please check the NetBeans IDE executable path.

My NetBeans IDE 6.5 executable path is

C:\Program Files\NetBeans 6.5\bin\netbeans.exe

We can add the registry entries manually by opening the regedit.exe application from the Start > Run menu, or we can create a REG file to achieve this.  Creating the REG file is the easiest option.  We will create a file with name openwithnetbeans.reg and we will copy the following contents in that file. Double clicking this REG file will add these registry entries to the Windows registry as required.


Windows Registry Editor Version 5.00

[HKEY_CLASSES_ROOT\*\shell\Open with NetBeans\command]
@="\"C:\\Program Files\\NetBeans 6.5\\bin\\netbeans.exe\" --open \"%1\""

[HKEY_CLASSES_ROOT\Folder\shell\Open with NetBeans\command]
@="\"C:\\Program Files\\NetBeans 6.5\\bin\\netbeans.exe\" --open \"%1\""

Now when we open the Explorer and right click on a NetBeans project folder we get option as Open with NetBeans and clicking on this option will start the NetBeans IDE and will open this project in the IDE.


We can see the project open in the NetBeans IDE for us.


When NetBeans IDE is already open this command will open the project in the existing IDE.  

Opening any file in NetBeans IDE from Windows Explorer
Now when we right click on any file in the Windows Explorer we get the same option of Open with NetBeans and the file gets open in the existing NetBeans IDE or if it is not open a new one is started for us.

This makes NetBeans IDE a general purpose editor for me to edit any file in my computer.  

with regards
Tushar Joshi, Nagpur

Tuesday, February 17, 2009

Using Command Line Arguments in NetBeans IDE

This post covers the following points:
  • How to open the project properties dialog box for NetBeans IDE projects?
  • How to use command line arguments while running programs through NetBeans IDE?
NetBeans IDE provides a way to invoke our Java program having a main method with command line arguments.  Let us walk through this process.  We will create a new Java Application project and will add some code to the Main method which will print the provided command line arguments on the console.

Test Code we have written in the Main method:


/*
* To change this template, choose Tools | Templates
* and open the template in the editor.
*/
package com.tusharvjoshi.argsdemo;

/**
*
* @author Tushar Joshi
*/
public class Main {

/**
* @param args the command line arguments
*/
public static void main(String[] args) {
if (args.length == 0) {

System.out.println("No Command Line arguments");

} else {

System.out.println("You provided " + args.length
+ " arguments");

for (int i = 0; i < args.length; i++) {
System.out.println("args[" + i + "]: "
+ args[i]);
}
}
}
}


Opening the project properties dialog boxWe can either right click on the project name in the Projects panel and choose the properties option, or we can choose the Project Properties option from the File menu.


Saving the command line arguments

In the project Properties dialog box we will have to choose the Run node from the left Categories tree.  As soon as we select the Run node we can see the options for the run configuration.

In the Arguments text box we have to type our command line arguments.  We can see we have typed "one two three" as the options in the dialog box for testing.


Now when we Run the project the project will run as if these command line arguments are being typed in front of the java command.  We can see the output window to check how the arguments are printed by our test code.

with regards
Tushar Joshi, Nagpur

UPDATE: 21 Mar 2014:
There is a plugin available for NetBeans IDE 8.0 which allows interactive command line arguments facility to the IDE, more details are in this post


Monday, February 2, 2009

NetBeans Voice of Community Process (VOC)


NetBeans is growing day by day as a IDE as well as a platform for RCP.  There is considerable volume of community attached with the NetBeans development and looking forward for the new features getting inroduced and also to the issues they face with the NetBeans IDE.

Feedback from Community
Community has many ways to manifest their feedback in the current Web2.0 age.  They write blogs, they write twitter messages, they write forum posts, they file bugs and request for enhancements in the NetBeans IssuZilla.   They write mails in the mailing lists like nbusers nbdev and openide.  

One more effort to listen:
It is thought that increasing overall satisfaction with NetBeans will support Word of Mouth adoption of the IDE which will support further growth of NetBeans userbase. That's why we needed a coordinated process whose primary motivation is to fix issues not only show that we care.

What is VOC?
NetBeans Voice of Community process is started keeping this in mind and it is a team of 3 community members and one representative from Sun. Along with me the other two community members who are now called as VOC Captains are Annabel Melongo and Michel Graciano.  The Sun representative is Jiri Kovalsky.

How VOC will work?
Channels are identified to gather feedback like nbusers@netbeans.org mailing list, netbeans chat, blogs, forums like DZone, TheServerSide.  So as soon as we find a issue or feedback which has BIG impact on NetBeans and where we know the reported of the issue and when the issue is reproducible we will register that issue as VOC issue and it will be given priority by the development team in the process of development of NetBeans.

How to send feedback directly to VOC?
Community members and NetBeans users can directly send their feedback to the VOC mailing list at voc@netbeans.org No subscription to the mailing list is needed to send the feedback.

References:
VOC Page

with regards
Tushar Joshi, Nagpur

Monday, December 29, 2008

Opening multiple NetBeans IDE instances simultaneously

Main concepts in this post:
  • --userdir NetBeans command line switch
  • opening multiple instances of NetBeans IDE
  • Netbeans about dialog box

This post answers questions like:
  • How to open two NetBeans IDE simulteneously?
  • What is NetBeans user directory?
  • What is the --userdir NetBeans command line switch?
  • How to know the current user directory of NetBeans?
  • How to use same NetBeans installation to open two instances?

Many a times we need to look two projects at the same time in NetBeans IDE.  If both the projects are open in two seperate NetBeans IDEs that will be easier to look into one IDE instance having one project and code into the other instance of the IDE for the other project.


The NetBeans IDE maintains one user directory for one instance.  The trick is to make seperate user directories and make shortcuts of NetBeans IDE to start the instances in those seperate user directories.  Through these shortcuts we can pass the instruction to the IDE about what user directory to choose while running the instance.

Let us take an example.  We will create two directories

1. D:\nbuserdir1 

and

2. D:\nbuserdir2

Now we will create two shortcuts on the desktop which can be done by copying the NetBeans shortcut in the start menu and making two copies with dufferent names.  Now we will right click on the shortcuts and will choose the properties.  Then we will change the execution path and add the additional part to that command as


<netbeanscommand> --userdir D:\nbuserdir1 for the first shortcut 

and

<netbeanscommand> --userdir D:\nbuserdir2 for the second shortcut.


Now we are ready to execute the NetBeans IDE in two instances.  When we double click on those instances we will have two seperate IDEs running simulteneously.

To check which user directory is currently used by the running IDE we can open the Help > About diablog box.  This dialog box will also show us the user directory used by the running instance.


with regards
Tushar Joshi, Nagpur

Tuesday, December 16, 2008

Annoyed about NetBeans IDE

Danny Nieuwegein from Netherlands is annoyed about NetBeans IDE and the most annoying thing in NetBeans IDE as he mentions, in his blog is, CTRL-F4 closing not only the code windows, but also the project window! and when he cleans up his screen by holding CTRL-F4, all the windows including project windows gets closed and then he need to track down the option to turn the project window back on!

I tried what he is saying and indeed the CTRL+F4 keyboard shortcut closes one window at a time in NetBeans IDE and ultimately you get just the main window.

I think Danny wants a way to close only the editor windows.  I tried to find out how to do that by right clicking an editor window.


I go the keyboard shortcut for closing all the editor windows as CTRL + SHIFT + W and it worked.  So now atleast this cannot be a reason to get annoyed with NetBeans IDE and we can use this keyboard shortcut to close just the editor windows.

With Regards
Tushar Joshi, Nagpur

Wednesday, December 10, 2008

Adding MIT license in Java Class as Header

For our open source project jcompare we are using MIT license.  According to the open source tradition we wanted the MIT license to be included in our source code files.  NetBeans makes the inclusion of license piece of cake through the templates feature.

We will use the Tools Menu and Templates option


In the various categories we have to select the Licenses Node.  We need MIT license to be listed there.  Initially there are only two entries under the Licenses node.  NetBeans CDDL and Default License.  The best way to create another license is select existing license and press the Duplicate button.

Let us press the duplicate button and we get a new License entry.  Important thing to note here is the license name shall be exactly as license-MIT.txt  

This will ensure we can use the default Java Class template as it is.   Now we will select that entry license-MIT.txt and press the Open in folder button to open this file.  We will have to change this file with our MIT license text which we will get from OSI site.


<#if licenseFirst??>
${licenseFirst}

${licensePrefix}Copyright (c)
${licensePrefix}
${licensePrefix}Permission is hereby granted, free of charge, to any person obtaining a copy
${licensePrefix}of this software and associated documentation files (the "Software"), to deal
${licensePrefix}in the Software without restriction, including without limitation the rights
${licensePrefix}to use, copy, modify, merge, publish, distribute, sublicense, and/or sell
${licensePrefix}copies of the Software, and to permit persons to whom the Software is
${licensePrefix}furnished to do so, subject to the following conditions:
${licensePrefix}
${licensePrefix}The above copyright notice and this permission notice shall be included in
${licensePrefix}all copies or substantial portions of the Software.
${licensePrefix}
${licensePrefix}THE SOFTWARE IS PROVIDED "AS IS", WITHOUT WARRANTY OF ANY KIND, EXPRESS OR
${licensePrefix}IMPLIED, INCLUDING BUT NOT LIMITED TO THE WARRANTIES OF MERCHANTABILITY,
${licensePrefix}FITNESS FOR A PARTICULAR PURPOSE AND NONINFRINGEMENT. IN NO EVENT SHALL THE
${licensePrefix}AUTHORS OR COPYRIGHT HOLDERS BE LIABLE FOR ANY CLAIM, DAMAGES OR OTHER
${licensePrefix}LIABILITY, WHETHER IN AN ACTION OF CONTRACT, TORT OR OTHERWISE, ARISING FROM,
${licensePrefix}OUT OF OR IN CONNECTION WITH THE SOFTWARE OR THE USE OR OTHER DEALINGS IN
${licensePrefix}THE SOFTWARE.
<#if licenseLast??>
${licenseLast}


Next step we will follow is to open the project.properties file.  We will navigate to the Files panel and expand the nbproject folder to see this file and double click on it to open it in editor.


We will add a new property in this file at the end.
That property will be

project.license=MIT


Now when we create a new class in our project the license text will be included as required.


The license file gets created in the config\Templates folder of the NetBeans user directory as shown in the image below:

with regards
Tushar Joshi, Nagpur

References:
UPDATE: NetBeans License Templates - John Yeary - John has more templates for licenses