Showing posts with label windows. Show all posts

Thursday, February 19, 2009

Open with NetBeans context menu in Windows

This post covers the following topics:
  • How to add Open with NetBeans to windows file and folder context menu
  • How to open any file in NetBeans without creating a project
  • How to use NetBeans IDE as a file and folder explorer
  • How to use the --open command line option for NetBeans IDE

--open command line option for NetBeans IDE
NetBeans IDE identified --open command line option and opens the file or folder given as an argument after this command line option.  This fact makes the NetBeans IDE useful to open any file and folder through command line.  In windows we can use this feature to introduce a context menu for files and folders in Explorer by tweaking the Windows Registry.

Adding Open with NetBeans option to windows context menu
In windows we can add two extries to the Windows Registry to add Open with NetBeans option to the Windows Explorer context menu.  These entries need absolute path of the NetBeans IDE executable so while trying this trick please check the NetBeans IDE executable path.

My NetBeans IDE 6.5 executable path is

C:\Program Files\NetBeans 6.5\bin\netbeans.exe

We can add the registry entries manually by opening the regedit.exe application from the Start > Run menu, or we can create a REG file to achieve this.  Creating the REG file is the easiest option.  We will create a file with name openwithnetbeans.reg and we will copy the following contents in that file. Double clicking this REG file will add these registry entries to the Windows registry as required.


Windows Registry Editor Version 5.00

[HKEY_CLASSES_ROOT\*\shell\Open with NetBeans\command]
@="\"C:\\Program Files\\NetBeans 6.5\\bin\\netbeans.exe\" --open \"%1\""

[HKEY_CLASSES_ROOT\Folder\shell\Open with NetBeans\command]
@="\"C:\\Program Files\\NetBeans 6.5\\bin\\netbeans.exe\" --open \"%1\""

Now when we open the Explorer and right click on a NetBeans project folder we get option as Open with NetBeans and clicking on this option will start the NetBeans IDE and will open this project in the IDE.


We can see the project open in the NetBeans IDE for us.
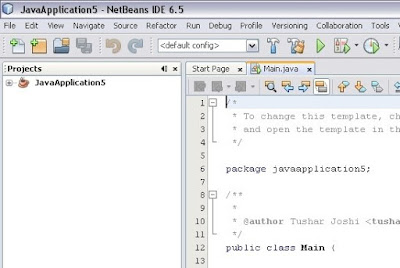


When NetBeans IDE is already open this command will open the project in the existing IDE.  

Opening any file in NetBeans IDE from Windows Explorer
Now when we right click on any file in the Windows Explorer we get the same option of Open with NetBeans and the file gets open in the existing NetBeans IDE or if it is not open a new one is started for us.

This makes NetBeans IDE a general purpose editor for me to edit any file in my computer.  

with regards
Tushar Joshi, Nagpur

Wednesday, August 13, 2008

NetBeans IDE 6.5 Beta - Auto Download for Subversion Client 1.5 in Windows

NetBeans IDE 6.5 Beta no longer needs Subversion client installed on Windows XP machine. I got this information in the New and Noteworthy page and since then was excited to try out the NetBeans downloading feature of the Subversion Client 1.5 for Windows from the Update Center.

When you do not have Subversion client installed...


After creating a sample application and choosing the Import into Subversion repository... option, NetBeans IDE 6.5 Beta now shows a dialog box indicating that it could not find Subversion client installed and offers two ways to proceed.

NetBeans IDE 6.5 Beta Offers bundled client


Either choose to download the bundled Subversion 1.5 binaries for Windows from the Update Center or Install the SVN 1.5 Command Line client. It also recommends to choose the first bundled option.

After choosing the bundled Subversion option it shows the license agreement for downloading and installing the bundled Subversion Client.

Accepting the license starts the download in the background. We can see the progress of the download in the status bar of the IDE.


It installs the component smoothly and then asks to restart the IDE. Clicking the restart button makes the IDE shut down and start again. This time before the splash screen it shows an Update banner for some time and then the usual Splash screen.


We still need to create our own repository if we want to keep the project in local repository. If we have a remote Subversion server than we can directly use the server. The point is now NetBeans IDE 6.5 Beta is ready to work with Subversion repositories.

We will choose a local already created repository (through TortoiseSVN) for this example.


Rest all the dialog boxes for showing the list of files to be committed and asking the commit comment will be shown and the files will be committed to the Subversion repository.

Here we can see the project successfully committed to the local subversion repository. NetBeans IDE 6.5 Beta has taken a good step by providing the bundled Subversion client which makes installation and use of Subversion even more easier now.

with regards
Tushar Joshi, Nagpur

Saturday, May 3, 2008

NetBeans IDE - Look and Feel

The default look and feel of the recently released NetBeans IDE 6.1 final is set automatically according to the operating system. This make the NetBeans appear as a Windows application with Windows look and feel while running on windows and so forth in other operating systems.

(Default look and feel on windows XP)

I like the cross platform look of java applications which can be set by configuring the java applications with the Metal look and feel. NetBeans also allows us to change the default look and feel by a configuration setting.

Ideally I would have loved to have a look and feel menu or a setting in the preferences dialog in the NetBeans IDE GUI to set the look and feel. The current way to change the default look and feel is either by changing the configuration file or passing a command line argument to the netbeans startup command.

I will use the configuration file setting method to change the default look and feel of NetBeans IDE.

As this setting is a configuration setting I will have to pass the exact fully qualified name of the look and feel class I want.

In our case as we want metal look and feel we will use the name:

javax.swing.plaf.metal.MetalLookAndFeel

When default paths are chosen for the installation of NetBeans IDE it gets installed in


C:\Program Files\NetBeans 6.1


The configuration files are kept in a subdirectory named etc so the exact path for the netbeans.conf file is:


C:\Program Files\NetBeans 6.1\etc\netbeans.conf


When opened in text editor it will look like


Here we will change the netbeans_default_options portion and add one additional switch to the options line.

(netbeans.con snap without look and feel setting)

We will add the look and feel option like


--laf javax.swing.plaf.metal.MetalLookAndFeel


(netbeans.conf with the additional look and feel option)

Now when we start the NetBeans IDE again the look and feel will be seen as Metal.

(Cross platform Metal look and feel)

References:

NetBeans Wiki: FAQ Custome Look and Feel
Java Tutorials: How to set Look and Feel

with regards
Tushar Joshi, Nagpur