NetBeans IDE 6.1 Beta blogging contest brought motivation for many bloggers. Many new blogs started and old ones continued to speak about NetBeans IDE.
With the list of top 10 winners the complete list of all participating entries is also published. Some more information which can be deduced from that list is bloggers have also submitted multiple entries for the contest.
These are the participants having maximum entries in the contest:
Tushar Joshi (This blog) 19 entries
Adam Bien 8 entries
Rhawi Dantas 7 entries
Alan M. Feldstein 4 entries
Jacek Laskowski 4 entries
Junji Takakura 4 entries
I have not included many bloggers having 3 or less than three entries. The multiple entries shows the flow of energy happening and the passion amongst the bloggers about using and blogging for NetBeans.
with regards
Tushar Joshi, Nagpur
Tuesday, May 13, 2008
Passion for blogging about NetBeans IDE
NetBeans IDE Blogging Contest Results

The results for the NetBeans IDE 6.1 Beta Blogging Contest are out. Congratulations to all 10 $500 American Gift Card winners and all other 100 winners who will get a NetBeans T-Shirt.
The results are available on the NetBeans Blogging Contest Page.
The top 10 winning posts are as follows:
| Matthew Nuzum | English | Netbeans 6.1 spanks Eclipse and challenges Visual Studio |
| Patrick Julien | English | NetBeans 6.1: The Best just got Better |
| Ding Liang | Chinese | About NetBeans |
| Diego Silva | Spanish | JavaScript en NetBeans 6.1 |
| Wagner Roberto dos Santos | Portuguese | O que podemos esperar do NetBeans 6.1 ? |
| Pat Coleman | English | Can NetBeans create a code-less P2P app? |
| James Eliyezar | English | Subversion and NetBeans - A quick start guide |
| Junji Takakura | Japanese | NetBeans 6.1 RC to use PHP |
| Jacek Laskowski | Polish | NetBeans IDE 6.1 - Spring Framework Support |
| Joshua van Aalst | English | NetBeans 6.1 A Delight To Use |
The list of participating blogs is published in a separate URL.
with regards
Tushar Joshi, Nagpur
Sunday, May 4, 2008
NetBeans IDE - Default Font Size
When we set out to search for the tips regarding how to change the default font and default look and feel for NetBeans IDE we get related information in seconds through any decent search engine.
Even then I am adding the same information again here with some fresh screenshots with the intension that,after this the user can find the information even sooner than I got it.
The default font size used by NetBeans IDE 6.1 is small and decent.
Some users may have different needs and want the font size to be bigger. NetBeans IDE has the facility to change the default font size through the configurations settings just like Look and feel setting.
In the netbeans.conf configuration file for NetBeans IDE which can be found in
C:\Program Files\NetBeans 6.1\etc\netbeans.conf
for the default Windows XP NetBeans IDE installation we can add the fontsize option to the netbeans_default_options string value
--fontsize 18
so make the configuration look like
netbeans_default_options="<old-options> --fontsize 18"
where <old-options> are the values already there which we will keep as they are and will add the new settings --fontsize.
This setting will make the default font size bigger and look like:

See how bigger the fonts can be seen now. Even the menus look like:

References:
NetBeans IDE Hacks part 2 font-size
NetBeans IDE Hacks part 2 laf
with regards
Tushar Joshi, Nagpur
Saturday, May 3, 2008
NetBeans IDE - Look and Feel
The default look and feel of the recently released NetBeans IDE 6.1 final is set automatically according to the operating system. This make the NetBeans appear as a Windows application with Windows look and feel while running on windows and so forth in other operating systems.
I like the cross platform look of java applications which can be set by configuring the java applications with the Metal look and feel. NetBeans also allows us to change the default look and feel by a configuration setting.
Ideally I would have loved to have a look and feel menu or a setting in the preferences dialog in the NetBeans IDE GUI to set the look and feel. The current way to change the default look and feel is either by changing the configuration file or passing a command line argument to the netbeans startup command.
I will use the configuration file setting method to change the default look and feel of NetBeans IDE.
As this setting is a configuration setting I will have to pass the exact fully qualified name of the look and feel class I want.
In our case as we want metal look and feel we will use the name:
javax.swing.plaf.metal.MetalLookAndFeel
When default paths are chosen for the installation of NetBeans IDE it gets installed in
C:\Program Files\NetBeans 6.1
The configuration files are kept in a subdirectory named etc so the exact path for the netbeans.conf file is:
C:\Program Files\NetBeans 6.1\etc\netbeans.conf
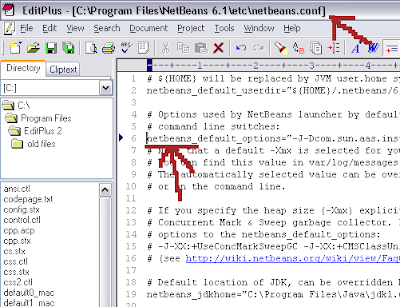
When opened in text editor it will look like

Here we will change the netbeans_default_options portion and add one additional switch to the options line.
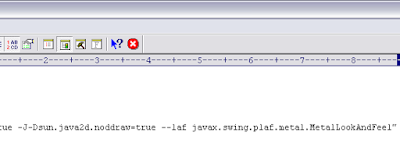
We will add the look and feel option like
--laf javax.swing.plaf.metal.MetalLookAndFeel
 (netbeans.conf with the additional look and feel option)
References:
NetBeans Wiki: FAQ Custome Look and Feel
Java Tutorials: How to set Look and Feel
with regards
Tushar Joshi, Nagpur
Friday, May 2, 2008
Matisse GUI designer - Seperation of Concerns
I like the separation of concern concept and I often use it while creating GUI applications. In Java I use interfaces to achieve separation of concern technique.
Let us explore this concept through an example. We will use NetBeans IDE 6.1 final as editor. The Matisse GUI editor will be used to design the GUI and then keep the generated GUI code separate from the main application logic as much as possible to apply the technique.
Let us assume a small application which will show a window with a text box for the user to type name. We will have two buttons Greet and Close. Greet will show a message with Greetings for the typed name and Close will close the application.
Once we have our expectations set right we can start designing the application and the logic. The main aspect of the separation of concerns concept is to keep the concerns seperate. There is one concern of showing the GUI and receiving user input from that GUI. The second concern is to show the greeting for the received name.
suppose we have a design like:
SimpleWindow as our GUI Frame class
SimpleExample as our main class
I will introduce one interface now
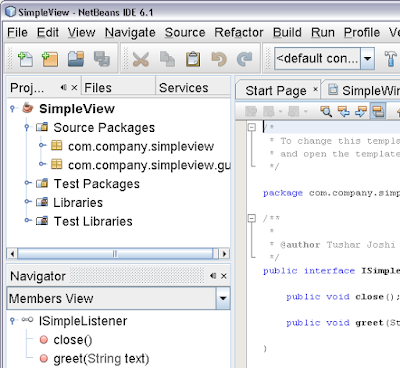
ISimpleListener for disconnecting the GUI from application logic. I have designed a simple GUI for this application by starting a JFrame form file in NetBeans new file wizard. The design contains a text box and two buttons as we decided.
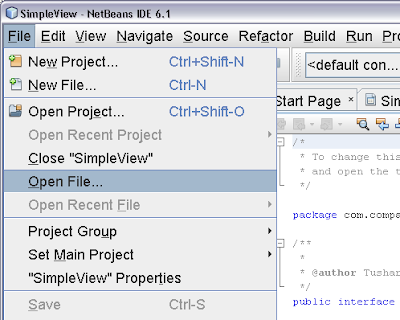
 By double clicking the buttons we can generate the event handlers in the designer. After double clicking the buttons IDE generated the required code for the event handlers. Now we need an interface to notify the events to anyone who will implement the interface.
/*
* To change this template, choose Tools | Templates
* and open the template in the editor.
*/
package com.company.simpleview;
/**
*
* @author Tushar Joshi
*/
public interface ISimpleListener {
public void close();
public void greet(String text);
}
This can be done by modifying the generated code and by introducing the interface in constructor and keeping a reference in the class.
 Then I will call the methods from the interface when the event handlers will be called from GUI.
 This is the only change we have to do in the GUI generated class. This is the minimum code we need inside the generated class. Keeping the generated class with minimum custom code will also help me change and regenerate the code again safely.
In the main class SimpleExample now I will use this SimpleWindow class and I will implement the interface so the events notification will be received by my main class and I can write my logic there.
/*
* To change this template, choose Tools | Templates
* and open the template in the editor.
*/
package com.company.simpleview;
import com.company.simpleview.gui.SimpleWindow;
import java.awt.EventQueue;
import javax.swing.JOptionPane;
/**
*
* @author Tushar Joshi
*/
public class SimpleExample implements ISimpleListener {
private final SimpleWindow simpleWindow;
public SimpleExample() {
this.simpleWindow = new SimpleWindow(this);
}
public void show() {
EventQueue.invokeLater(new Runnable() {
public void run() {
simpleWindow.setVisible(true);
}
});
}
/**
* @param args the command line arguments
*/
public static void main(String[] args) {
new SimpleExample().show();
}
public void close() {
EventQueue.invokeLater(new Runnable() {
public void run() {
simpleWindow.setVisible(false);
}
});
}
public void greet(String text) {
JOptionPane.showMessageDialog(simpleWindow, text);
}
}
One thing to note here is if I want the GUI in a different way I can change the GUI provided that I dont break the interface and the notifications. The two classes are connected only through this interface to communicate with each other.
This technique is my favorite technique for GUI applications.
with regards
Tushar Joshi, Nagpur


